Many Motorola users have not clue how to taks records on your phone to the hard disk drive of your computer. It is beneficial when you are going to buy a new phone, reset the handset or do any other thing that is likely to result in data loss. And here's how.
Backup Motorola Data Manually
Before we get to the parts how to do it with tools, I want you to know that it can also be done manually. The steps are listed here for your reference.
Step 1. Connect the phone to a computer via a USB cable. (Window or Mac will both work.)
Step 2. Pull down the menu on your Android and choose "USB Connection" (Swipe your finger down from the top.)
Step 3. Pick "USB Mass Storage" and hit OK. (Your phone will then be detected as a removable disk just like a USB driver.)
Step 4. Go to your computer and find the driver. Copy the all the files in it (or whichever you want) and paste them to the computer. You might want to name it so that the backup can be later found when necessary. It is up to you for the naming, but using the date and the content is always a nice way. 160825-motorola-backup, for example, seems clear and easy to remember.
As for methods with tools, usually you can turn to Motorola Device Manager for help. But, as the program fails to work properly a lot. Today we are going to show you how things are done easier with other applications: Android Data Recovery, Android Manager and Mobile Transfer.These three ways have the common features. That is to back up the device files to the computer and they also enable you to restore the backup files. Certainly, they are different in operation details, so let's have a look.
Part One: Copy Motorola files to PC with Android Data Recovery
The thing excites the most is that Android Data Recovery supports nine kinds of data which include contacts, call logs, messages, calendars, photos, videos, audios, apps and app data. This has nearly cover all the types we can think about. Plus, the program is able to show you details before recovery. Quite thoughtful.
Step 1. Connect the Moto to PC
You'll need to download it by clicking on the buttons above. After installation,double click the icon and plug the phone in with a cable. Then you'll see this, telling how to enable USB debugging. Follow the instruction and get it done.
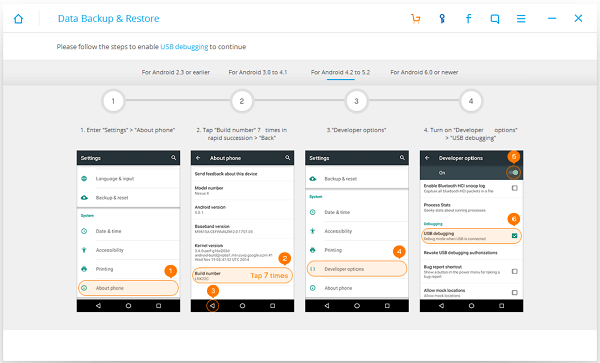
Step 2. Backup Data
Click "More Tools">enter "Android Data Backup&Restore">choose "Backup". And it's time for you to pick which kinds of file to save. In this case, we'll tick them all and press on the button "Backup".
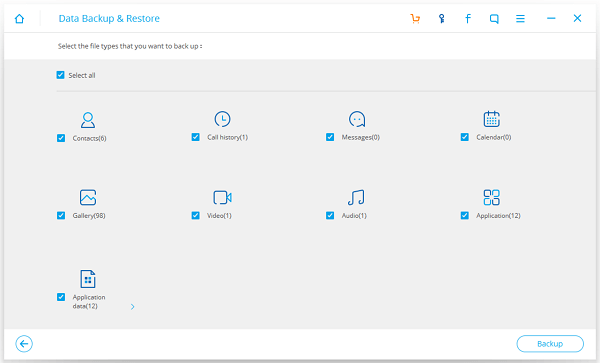
Tips to recover data: Click "More Tools">enter "Android Data Backup&Restore">choose "Restore".
Part Two: Transfer Files from Moto to PC with Android Manager
Android Manager offers ways to do Moto backup to computer and the backup files can be viewed when opening the folder, such as photos, videos, music, contacts, apps, etc.
Step 1. Download Program on PC
When you think this program is possible and you want to have a try, download it and enter the homepage. Your device's details will be shown as below.
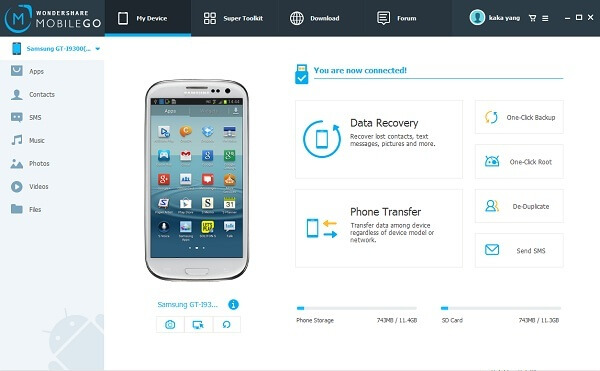
Step 2. Back up Data with One Click
On the home page, click "One-Click Backup" on the right side. You can see a pop-up comes and it allows you to choose the kind of data so the progressing bar will appear.
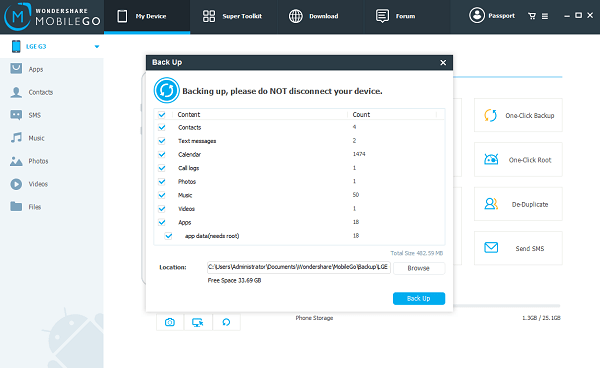
Part Three: Motorola Data Can Be Moved via Mobile Transfer
Mobile Transfer, which is well designed for communication between two mobile phones or between a phone and a computer, provides you with an easy one-click solution. Surely, you will know how to backup Motorola Data to PC via this help. (Also, you can recover the lost Android files with it by going to "Super Toolkit">"Restore".) Download Mobile Transfer and have a try.
Step 1. Get the Phone Connected
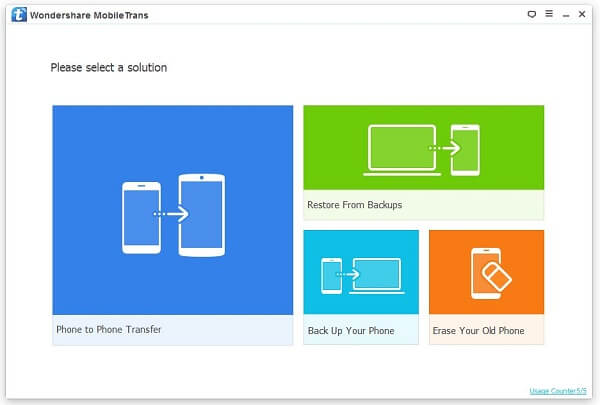
Open Mobile Transfer and this interface will pop up. As you can see, four sections are contained. We need to choose "Back Up Your Phone" in the color light blue. And then, you need a USB cable to plug the device in.
Step 2. Tick File Types You Want to Store and Back Them up
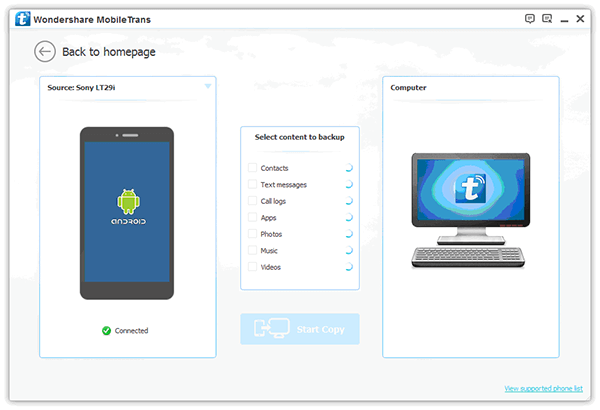
Your handset will be detected. When this is done, you can see the word "Connected" and the name of it on the left. The "Computer" on the right stand for where the backup is going to. And in the middle, there are some circles behind the items, which means that analysis is undergoing. After the software has finished that, the numbers of each file type will replace them. Tick "Contacts", "Text messages", "Call logs" or whatever you like and press the button "Start Copy" at the bottom. Waiting is all we need afterwards. (A box which says "All selected files are backed up completely" will pop up at the end.)
So, this is the end of the guide. As you can see, it's obviously that using a tool is way better than doing it manually because the files are all well catergorized. Are there any details you don't understand? Leave your questions below. And share these useful methods on Facebook or Google+ if you want to.
Related Articles
- Transfer Photos from Android to Computer: It teaches you how to backup photos.
- Transfer Files Between Computer and Android: It shows you how to save and recover files.
- Export Android messages to Computer: It tells you how to save SMS to PC.
- Backup and Restore Sony Xperia Data: It shows you how to store and retrieve Sony data.
