Perhaps you've seen ADB (Android Debug Bridge) quite a few times but still have no idea what it is. Then, that's not a single case. There are few guides online giving further explanations on such a term. That's why I'm rolling out this guide for you. To gain more knowledge, please move your sight below.
People Also Read:
● How to Enter and Use Android Recovery Mode?
● How to Apply Update from ADB with 'adb sideload'?
Part 1. A Brief Introduction - What is ADB?
ADB is short for Android Debug Bridge, which is a versatile command line program that acts as a bridge between an Android device and a PC allowing data to be transferred. To build such a bridge, one has to open the gate of an Android. That being said, enable USB debugging.
After that, you can do a sort of things like restoring bricked device, installing a new ROM, installing a third party app, unlocking a locked device, rooting and more. ADB includes three components:
- A client sends commands.
- A daemon (ADHD) runs commands on a device.
- A server manages communication between the client and the daemon.
Part 2. How to Install and Set Up ADB Correctly?
Many said that they've downloaded ADB (Android Debug Bridge) but got no clue how to manipulate it. Even by following some instructions on the internet, it failed somehow. For that, they might have got down to a fake guide.
As a matter of facts, there is no need to install ADB. I know you've got an "adb.exe" (an installment program), however, it's totally okay to leave it alone.
Quite a few guides might ask you to move the package of ADB file to such a route: C:\Windows\System32. When done, open a command window (hold "Shift" key and right click) and type in a command like "adb devices". If lucky, you might get an instruction and the adb has been installed.
However, most of the time, errors crop up saying that it cannot boot up the program because something is lost. How come? All the files are here but the process just cannot proceed. Perhaps, you might have done such things as shown below.
1. Just move the "adb.exe" file to System32 folder.
2. Didn't open a command window but instead, directly launch "adb.exe".
3. Didn't open a command window in the folder in which there is "adb.exe" file.
4. The file is incompatible with the operating system of your computer.
5. The package you downloaded is originally incomplete. (Download links are provided in the Part 3)
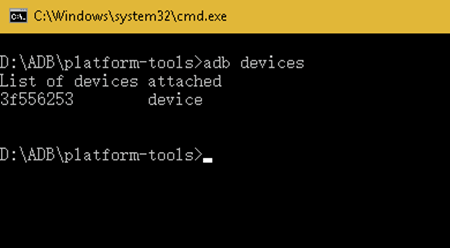
So, how to install and set up ADB correctly? The reason why you should move the ADB package to System32 folder is that the "cmd.exe" program is here. However, in fact, "cmd.exe" is just a command window. Let's FORGET "cmd.exe". What you need to do is stay put in which the ADB package is. Then, hold down "Shift" key and right click your mouse. Now, select "Open command window". Next, type in "adb devices" and you will get a serial number ended with "device". which means that the adb.exe has been properly installed on your computer.
Part 3. Where Can You Get and Download Android Debug Bridge?
If you don't know where to download the ADB package in zip format (also known as Platform-Tools package), here are the links for your reference. There are three packages respectively compatible with Mac, Linux, and Windows operating system. The packages downloaded from here are always the latest ones. If you need it, please click on it and download the package onto your computer.
● Platform-Tools Package - Mac
● Platform-Tools Package - Linux
● Platform-Tools Package - Windows
After you download and unzip the package, you will get a bunch of files. Please don't freak out. Just make sure that you have these four files: adb.exe, fastboot.exe, AdbWinApi.dll and AdbWinUsbApi.dll.

That's the end of this guide. If you're still having lingering questions in mind, just speak it out and I'm glad to help you out.
