Looking for a Samsung Photo Transfer for Windows/Mac computer? If you want to transfer photos from Android like Samsung phones to a computer running Windows XP/Vista/7/8/10 or Mac OS X/Captain/Yosemite/Sierra. There is a silver bullet for your consideration.
People Also Read:
● How to Retrieve Deleted Photos on Android?
● How to Transfer Photos from Android to Android?
Android Transfer - TunesGo is an authentic Android File Transfer for Win and for Mac. This easy-to-use software provides the simplest way for users to manage significant data like Music, Ringtone, Videos, Movies, Photos, Contacts, Text Messages, Apps and SD Card Content. Now, it works fine with all Samsung devices including Samsung Galaxy S6/S7/S8/Note 8. To see how to transfer pictures between Samsung and computer, please read on.
Tutorial 1: How to Copy Samsung Photos to PC Selectively or With One Click?
Android Transfer - TunesGo offers two ways to move Samsung photos to PC. One is to selectively choose desired photos to export to a computer, the other is to back up photos to PC with one click. Now, let's see how these work.
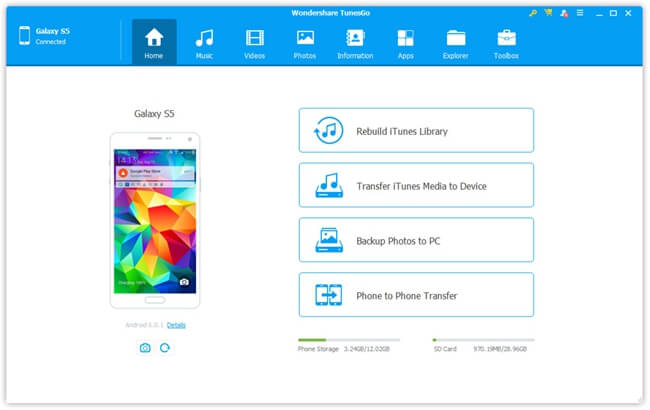
Tutorial to Selectively Export Samsung Photos: Step 1. Get Down to Android Transfer - TunesGo. After the installment of Android Transfer - TunesGo, please launch the software on your computer. Then, use USB cable to connect your Samsung phone to it. Don't forget to enable USB Debugging so as to let the software successfully detect your device. When detected, you can see the screen as below. You can click "Details" to check out more information about your Samsung.
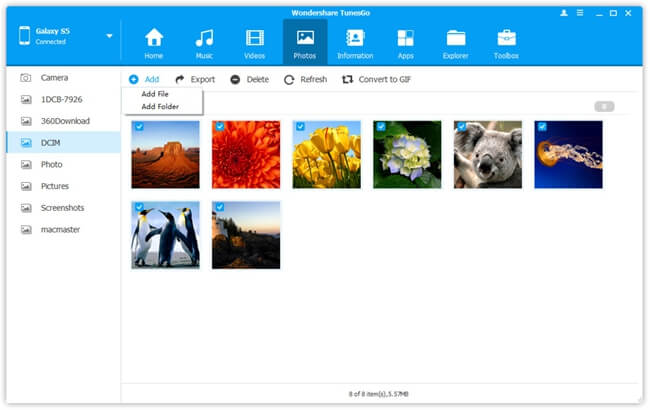
Step 2. Export Desired Photos. Now, select the "Photos" tab on the top. The tool will start loading the current photos out. When done, please check them out. You're allow to preview the photos in advance.

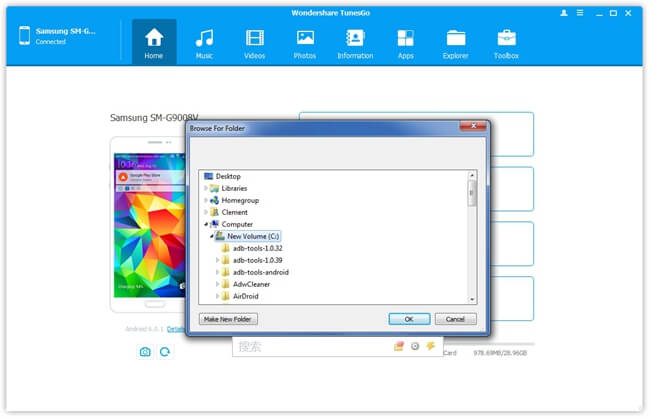
Then, you should tick up those you want to export and click the "Export" button. Please click "Export to PC". (If another device is connected, there will be an option to export to the device.) Next, select a target folder and photos will be saved to PC soon.Note that you can make interesting GIFs out of photos via "Convert to GIF".

Tutorial to Export Samsung Photos with One Click for free:
Step 1. Open the Android Transfer - TunesGo tool.
Step 2. Hook up Samsung to it via USB cable.
Step 3. Enable USB debugging on Samsung.
Step 4. When detected, click "Backup Photos to PC" option.Step 5. Select a folder to store and it's all done.
Tutorial 2: How to Transfer Photos from Computer to Samsung Phone?
It's also feasible to import pictures from your computer to Samsung, especially when there is a batch. Android Transfer - TunesGo allows users to move photos or a folder of photos into Samsung device without a hitch. Here's how:
Step 1. Hook Up to Android Transfer - TunesGo. Please use USB cable to connect your Samsung to the computer, and enable USB debugging on your device. It takes no time to detect your Samsung. Please check out the device information on the screen.
Step 2. Transfer Photos Back to Samsung. Now, click on the "Photos" tab and it takes a while to load photos out. To import photos to Samsung, please click on the "Add" button. Then, you should go with "Add File" or "Add Folder". After you select desired pictures, the process starts.
Pros:
1. You can selectively add pictures one by one by "Add File" or transfer batch photos by "Add Folder".
2. Various data and devices running Android and iOS supported.
3. Extra useful tools provided, including Backup & Restore, Photo to Phone Transfer, Convert Photos/Videos to GIFs, Once-Click Root, Ringtone Maker and so on.
Extra Tip: How to Retrieve Photos If Not Yet Backing Up?
It takes a great price for the awareness of significance of a backup. If you're the one who noticed the loss of photos happens before you backed up your Samsung, you'd better try this way. However, you should stop using your Samsung to avoid overwriting the lost data.
Step 1. Download and install Android Photo Recovery on your Win/Mac computer.
Step 2. Connect your Android to it and enable USB debugging on Android.
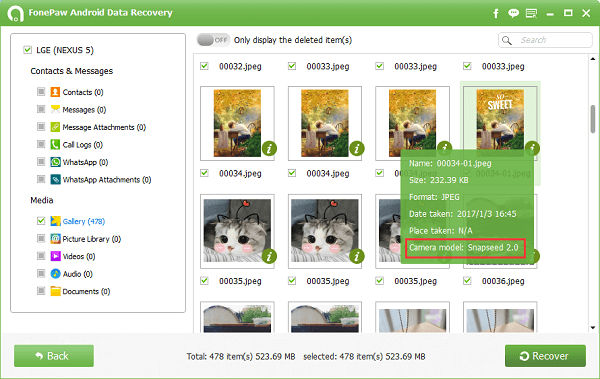
Step 3. Select the "Gallery" option and click "Next".
Step 4. On your Android, tap on "Allow" for confirming the authority.
Step 5. Check out photos that are just scanned out.Step 6. Make your choices and click on "Recover" to restore pictures to the computer.
Got it? So, it's recommendable to form a regular backup habit. Precious memory should not be lost, right? The one-click backup feature is totally for free, you definitely should give it a go.
