Is there a way to get back lost files from ASUS ZenFone 3? "Hi there, my two little kids made all my contacts, important messages and photos stored in my ZenFone 3's memory deleted. I don't have a backup of them. Is it possible to get them back? How do I recover lost data on ZenFone 2/3? Please suggest a solution. Urgent!"
If you don't have a backup of your deleted Android like ZenFone 2/3, we are afraid that you will need to use recovery tool to recover them. Fortunately, there are lots of options out there, and Android Data Recovery is one of them that work well. Here's a guide explaining how to restore accidentally deleted files like contacts, messages, call history, photos, videos, document, etc. from ZenFone.
Part 1. Recovery Principle and Tips
When we delete an Android file, in fact, it is just hidden. As Windows system had a "recycle bin" used to story temporarily files that are deleted by the users, Android also has a place to store your deleted files. If the files are mistakenly deleted, we also can recover them from that "recycle bin".
That is to say, as long as and the space hasn't been covered by new files after the files are deleted, we still have chance to recover them. File recovery software is used to search, find out the files that have been marked and try to restore your lost data.
Part 2. Recover Lost Data on ZenFone 2/3
Step 1. Plug ZenFone 2/3 to Windows/Mac
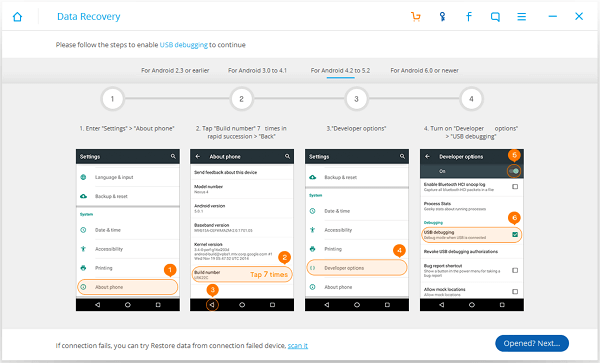
To start with, connect your ZenFone 2/3 to your Windows/Mac computer. To make sure you Android device is recognized, USB debugging is required. For Android 5.0 or newer: Move to "Settings" > "About Phone" to tap "Build number" seven times for "You are now a developer!" signal. Then, move to "Settings" > "Developer options" to turn on "USB debugging"

Step 2. Select Data Types to Scan and Restore
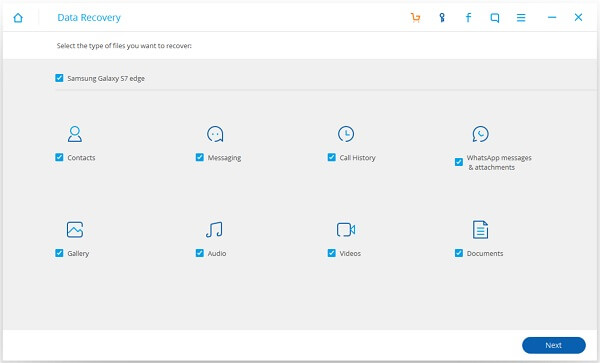
After your ZenFone 2/3 is detected, you can select file types to scan. All file types are displayed in the below menu. Select the ones you want and click the "Next" button.

Step 3. Allow Superuser Request
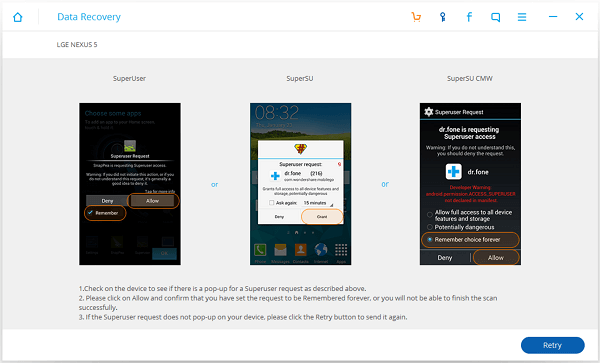
Before getting the privilege to scan your Android, the program cannot access your handset. So you need to allow Superuser request:
- Check on the device to see if there is a pop-u for a Superuser request as described in the software.
- Please click on Allow and confirm that you have set the request to be Remembered forever, or you will not be able to finish the scan successfully.
- If the Superuser request does not pop-up on your ZenFone 2/3, please click the Retry button to send it again.

Step 4. Scan Android Files in ZenFone 2/3
When Superuser request is allowed, Android Data Recovery will scan your ZenFone device and detect content containing in selected file categories. During this process, please wait patiently.
Step 5. Preview and Recover Lost Data on ZenFone
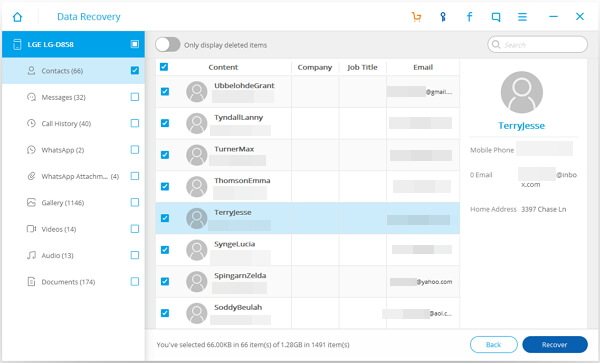
When scan is finished, choose file types you want at the left pane and display contents in the table. When this is done, you can select contents you want and click the "Recover" button to get lost stuffs back.

