The other day, some people ask me for Android Recovery Mode. They are wondering what Android Recovery Mode uses for. Are you interested in it like them? Now I will tell something about this function.
People Also Read:
- How to Recover Deleted Data from Android Internal Memory
- How to Apply Update from ADB with 'adb sideload'?
Android Recovery Mode is a feature of Android Device. You don't need to install some program on your phone or connect to other devices. Just make your Android Power off and via keys combination to access this mode. Android Recovery Mode including update software manually, clear cache partition, update from Android Debugging Bridge.
Part 1: What is Recovery Mode on Android?
What is Recovery Mode of Android Device?
Recovery mode refers to the bootable partition in Android phone, in which the recovery console is installed. Once entering this mode, users might access a few core functioning in their own device. Recovery mode provides features to help users fix installations as well as install official OS updates by using a combination of key presses or instructions from a command line sometimes.
What does it for? In the past, a phone is more of a device used to make calls or text. However, it's much more than that. Most Android devices are now defaulted with a fairly simple Recovery mode with features like Reboot System Now, Apply Update from ADB, Apply Update from External Storage, Wipe Data/Factory Reset, Wipe Cache Partition, Apply Update from Cache. Just like a lot of other things with Android, even the Recovery Mode can be customized to do more things. To gain further knowledge, please scroll down and read on.
How Does Recovery Mode Help?
Reboot System Now
This option is indicating to restart your phone. You Android will power off and then reboot into the commend interface. When you have completed the recovery mode, select it.

Apply Update from ADB
To use this function, you'd better connect Android and computer to enable to build the "bridge" between them. Android Debugging Bridge allows you to run Android Device and do some operation through computer to Android. Android App developer will repair bugs of applications via this option. Of course you can use computer to send and install update onto your phone by connecting Android and computer. This could be pretty rarely used for person but if you ever need to use this tool you can often find step-by-step instructions by performing a quick search online.
Apply Update from External Storage
Maybe your phone always successfully to connect to PC neither via USB cable nor Wi-Fi and you want to download applications, music, photo or any other data from computer to Android. So you will take the method of using phone memory card to be the bridge of computer and Android phone. Plug the card from Android and put it into computer. Then download something you want to and reinsert the memory card to mobile phone. But how to update information of your memory card to enable Android device to detected the new content of it? This time you can use this tool, apply update from external storage. When you click this option, Android phone will discover the new data.
Wipe Data/Factory Reset
It is obviously that when you want to sell or throw away your old phone, to clear up all the data in it will be secret and safe. So wipe data/factory reset will do you a favor to delete all information of your phone and restore to factory settings stage.
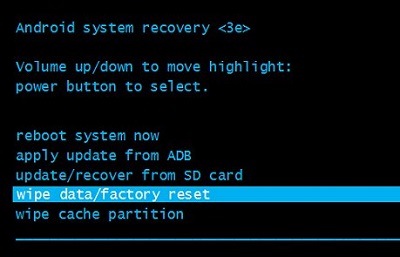
Wipe Cache Partition
Are you accustomed to clear cache? Cache is always ignored by us and piled up in anytime. As we use Android cache can tend to pile up and I am not just referring to apps, photos or text messages. Some of these that can add up over time run in the background of the device and we don't even know it! This temporary data is stored in the phones memory and can help the phone boot up quicker or help your apps run faster. Performing a wipe cache partition clears out some of this temporary data can help prevent troublesome issues. It's important to note that choosing to wipe cache partition will remove data from your device but only temporary data and it doesn't remove or erase any personal information or user data from the device.
Tips: As lots of users complained about the bricked phone, actually "wipe cache partition" can fix most cases. Just get your device into recovery mode and select this mode with the volume key. After that, reboot the system to get it back to normal. This method works for many devices.
Apply Update from Cache
Applying update from cache is rarely in used to update mobile phone but you don't have computer and memory card to update your device.
It will download the update file to your phone via the phones wireless data connection. Although Wi-Fi connection will be a faster way to download, the update file can be downloaded using an internet connection provided by either your mobile data or a Wi-Fi connection. I suppose the file could be downloaded to a PC and then transferred to the phones files system that way as well. In any case the update file could be put into the cache directory which you need to have Super User permission to do, thus your phone needs to be rooted.
After the update file is in your cache folder you should be able to shut off your, boot into the Android Recovery Mode screen, highlight and select the "apply update from cache" option. By the way, you may have to manually select the update file you want to apply, once selected the update should begin.

Part 2: How to Enter Recovery Mode Manually on Android Devices of Brands?
Now how to enter Android Recovery Mode? The method is going to vary from device to device. Generally, shut down Android and make sure it unplugged to the charge. If you have no idea, it's a good idea to follow the onscreen instructions as below.
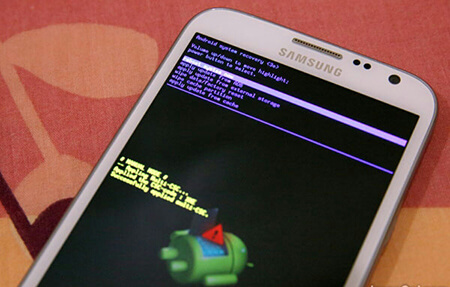
Samsung Galaxy Phones:
Step 1. Power off your Android by pressing the "Power" button and select "Power off".
Step 2. Press and hold down "Volume Up", "Power" and "Home" buttons at the same time until the device turns on.
Step 3. Now, your device goes into "Recovery Mode".
LG Phones:
Step 1. Power off your LG G phone.
Step 2. Press and hold the "Power", "Volume Down" buttons simultaneously.
Step 3. When a menu appears, release your fingers.
Step 4. Then navigate to "Recovery mode" and use the Volume keys to select certain option but confirm the choice with "Power" key.
HTC One Series:
Step 1. First of all, disable Fastboot of your HTC One 9/One 8 by entering "Settings" > "Battery" and disabling Fastboot.
Step 2. Turn off your HTC One phone.
Step 3. Press down the "Power" and "Volume Down: buttons at the same time for 10 seconds.
Step 4. When you see a pop-up menu with the "Recovery mode" option, you can release you finger.
Step 5. Then go to that option and press the "Power" button to enter.
Nexus Phones:
Step 1. Hold down "Power" key and "Power off" your Nexus phone.
Step 2. Press and hold down the "Power", "Volume Down" keys together for seconds.
Step 3. Keep holding the buttons until a pop-up with "Recovery mode" option appears on the screen.
Step 4. Press the "Volume" buttons to select Recovery mode option.
Part 3: How to Enter/Exit Recovery Mode via Android Data Recovery?
Case 1: Normally Exit Store Recovery Mode
If you want to get out of Recovery Mode, the easiest way to go is choose "Reboot System Now" in the menu. It will restart your device and boot in the normal screen. Or, you might directly press down "Home" and "Power" buttons to forcibly shut down the device and then turn it on with "Power" button.
Case 2: Android Stuck in Recovery Mode
When your device goes wrong and it is necessary to save the phone data and put the device into recovery/download mode to fix your phone. At this point, you can follow the guide of Android Data Extraction to enter and exit the recovery mode as well as it can recover your broken device in some cases.
Step 1. After Android Data Extraction being installed on your computer, please launch it and select "Broken Android Phone Data Extraction" on the left panel.
Step 2. Click on "Fix Device" button and select "Others" according to your case.
Step 3. Choose your device information and boot into Download Mode.
Step 4. Click on "Start" and begin to fix the issue.
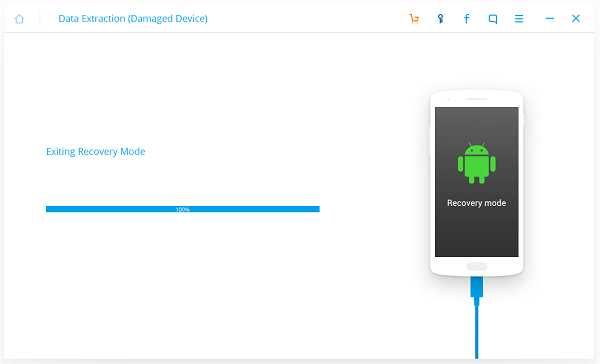
Android Data Extraction is also workable to retrieve you data currently stored on faulted device.If you need any further help, please get in touch with me on Android-Recovery.
